WebDAV server with Nginx and FreeBSD
Recently I've been working on a small Neocities page to post about my hobbies not related to tech. Neocities offers WebDAV integration to manage the site's files. I decided it's simple and convenient enough to use it for file syncing in other places too.
It takes a few minutes to set up on Linux with nginx, and while the process is similar for FreeBSD, there are a few caveats. I haven't found a user-friendly, step-by-step guide online, so here's my own.
Nginx
By default, nginx is shipped with the ngx_http_dav_module which covers most, but not all WebDAV methods. To provide the full protocol support, we will need the ngx_http_dav_ext module, which isn't included by default. One of the ways to achieve that is manually re-compiling nginx from ports.
First, ensure our ports tree is up to date:
portsnap fetch extract
portsnap fetch update
Now we have everything we need to build nginx. Go to /usr/ports/www/nginx and as root, call:
make configure
You will be greeted with a list of available modules. Scroll down a bit and you should see HTTP_DAV_EXT module. Make sure both HTTP_DAV and HTTP_DAV_EXT are checked.
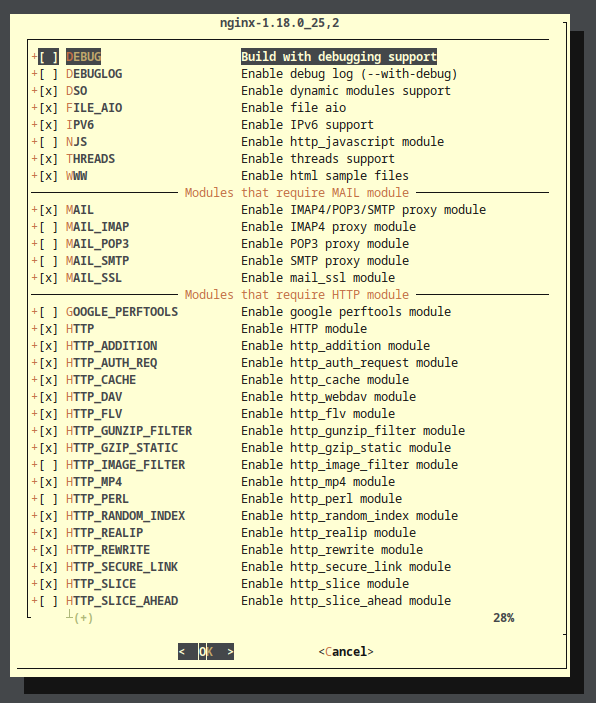
Press "OK" and proceed. You will be asked about a few other configuration options, if you are not sure what to pick, it's okay to go with defaults. Now build and install nginx simply by calling:
make && make install
You can verify the nginx got installed by checking the output of nginx -v. To check if the needed modules were installed, check the /usr/local/libexec/nginx directory. You should see the file called ngx_http_dav_ext_module.so in there.
nginx.conf
With our nginx up and running, we can move onto configuring it to handle DAV.
Navigate to /usr/local/etc/nginx and open nginx.conf. First, we need to load our newly installed DAV ext module, so let's stick it somewhere near the top of the file:
user  www;
worker_processes  auto;

# ...

load_module /usr/local/libexec/nginx/ngx_http_dav_ext_module.so;
In our case, we want to be able to connect through a subdomain (let's say webdav.example.com), so let's go ahead and configure a new server block.
    server {
    	access_log /var/log/nginx/webdav.example.com.access.log;
		error_log /var/log/nginx/webdav.example.com.error.log;
		listen 80;
		server_name webdav.example.com;
		root /usr/local/www/example.com/html;

		location / {
			# options_will_go_here
		}
    }
Pretty standard stuff. Now we need to define DAV methods we want to handle. PUT, DELETE, COPY and MOVE are rather self-explanatory. MKCOL is needed to allow us to create directories and PROPFIND enables searching. OPTIONSworks just like in regular HTTP requests.
	location / {
		davmethods PUT DELETE MKCOL COPY MOVE;
	    davextmethods PROPFIND OPTIONS;
	    davaccess user:rw group:rw all:rw;
Full list of available methods can be found here.
Then we have to set temp path and turn off client_max_body_size to be able to send files without size restrictions. Depending on your use-case, you may want to set it to a real limit instead.
	    clientmaxbodysize 0;
	    createfullputpath on;
	    clientbodytemp_path /tmp/;
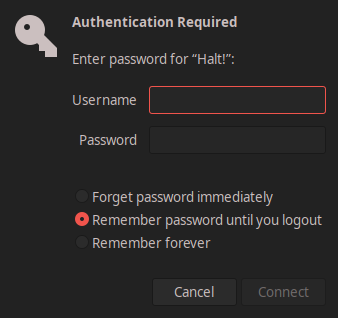
Lastly, we could use some authorization. I really wanted to be fancy and set up PAM for it, but despite spending a few hours, I wasn't able to get it to work properly. I'm probably misunderstanding something basic about how BSD handles permissions. If you know how to set it up, please shoot me a message! For the sake of our example, we'll go with basic auth for now. We need to point nginx to the .htpasswd file and optionally set a login prompt text:
		authbasic "Halt!";
		authbasicuserfile /usr/local/etc/nginx/.htpasswd;
	}
Save the file and restart the nginx service. Navigate to your DAV client of choice (a lot of file managers have in-built support for it, I am using Thunar) and type dav://webdav.example.com. If everything worked correctly, you should something like this:
Let's create an user, so you'll be able to actually log in.
(really) basic auth
If you have Apache utils installed, you can just use htpasswd tool to generate credentials. However, since in our example we're using nginx, there's a chance you don't. But you should have openssl installed.
openssl passwd -apr1
Now you should be able to log in through your client. ^^"